それでは、Spring MVCで、サンプル的なWebアプリを作ってみましょう。
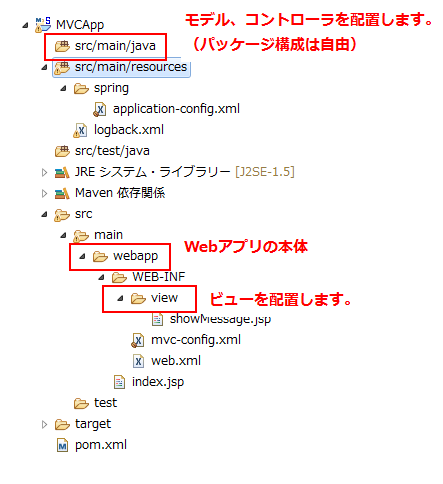
その前に、どのディレクトリにどのようなファイルを配置すればよいのか解説します。
ディレクト構造

| ディレクトリ | 説明 |
|---|---|
| src/main/java | モデル、コントローラを配置します。(パッケージ構成は自由です。) |
| src/main/webapp | Spring MVCのWebアプリの本体です。 |
| src/main/webapp/view | ここに、ビューであるjspを配置します。 |
サンプルアプリを作成する。
Webアプリケーションといえば、まずは「コントローラ」ですよね。まずは作成しましょう。
「src/main/java」フォルダにて、「右クリック」→「新規」→「クラス」を選択します。

パッケージ名、クラス名を入力して、「完了」をクリックします。

MvcController.java(作成したコントローラです。)
|
1 2 3 4 5 6 7 8 9 10 11 12 13 14 15 16 17 |
package mvcapp; import org.springframework.stereotype.Controller; import org.springframework.ui.Model; import org.springframework.web.bind.annotation.RequestMapping; import org.springframework.web.bind.annotation.RequestMethod; @Controller public class MvcController { @RequestMapping(value = "/helloWorld",method = RequestMethod.GET) public String helloWorld(Model model) { model.addAttribute("message", "Hello World!"); return "showMessage"; } } |
使っているアノテーション
| アノテーション | 説明 |
|---|---|
| @Controller | コントローラクラスであることを表します。コントローラを作る際は必ず指定しましょう。 |
| @RequestMapping | 「リクエストマッピング」を指定するためのものです。(要は、「/helloWorld」というURLと、ここで作ったメソッドを紐づけています。) |
引数のModel
Modelは、コントローラと、ビューの間で値を共有するためのクラスです。
役割としては、JSP/Servletで言えば、セッションと同じですね。
下記のようにモデルに値を設定することで、ビューでその変数を使うことができるようになります。
|
1 |
モデルのインスタンス.addAttribute("変数名", "値"); |
また、メソッドの戻り値でStringの文字列を返していますが、この文字列を「main/main/webapp/WEB-INF/view/(文字列).jsp」という形でJSPファイルを検索します。
showMessage.jsp(デフォルトでも存在するJSPファイルです。)
|
1 2 3 4 5 6 7 8 9 10 11 12 13 |
<!DOCTYPE html> <%@ page language="java" contentType="text/html; charset=UTF-8" pageEncoding="UTF-8"%> <html> <head> <meta charset="utf-8"> <title>Welcome</title> </head> <body> <h2>${message}</h2> </body> </html> |
Spring MVCプロジェクトを作成した際にデフォルトで存在するJSPをそのまま使っています。
「${message}」の部分が、コントローラとやりとりするModel変数を示します。
mvc-config.xml
|
1 2 3 4 5 6 7 8 9 10 11 12 13 14 15 16 17 18 19 |
<?xml version="1.0" encoding="UTF-8"?> <beans xmlns="http://www.springframework.org/schema/beans" xmlns:xsi="http://www.w3.org/2001/XMLSchema-instance" xmlns:mvc="http://www.springframework.org/schema/mvc" xmlns:context="http://www.springframework.org/schema/context" xsi:schemaLocation="http://www.springframework.org/schema/mvc http://www.springframework.org/schema/mvc/spring-mvc.xsd http://www.springframework.org/schema/beans http://www.springframework.org/schema/beans/spring-beans.xsd http://www.springframework.org/schema/context http://www.springframework.org/schema/context/spring-context.xsd"> <context:component-scan base-package="mvcapp"/> <mvc:annotation-driven /> <bean class="org.springframework.web.servlet.view.InternalResourceViewResolver"> <!-- Example: a logical view name of 'showMessage' is mapped to '/WEB-INF/jsp/showMessage.jsp' --> <property name="prefix" value="/WEB-INF/view/"/> <property name="suffix" value=".jsp"/> </bean> </beans> |
Spring MVCでは、アプリを作ったら、設定ファイルに登録する必要があります。
元々、下記のような記述があるかと思いますが、コメントアウトを外しましょう。
|
1 2 3 |
<!-- Uncomment and your base-package here: <context:component-scan base-package="org.springframework.samples.web"/> --> |
base-packageというにて、作成したパッケージを指定します。そうすると、ここで指定したパッケージから コントローラを検索してくれます。
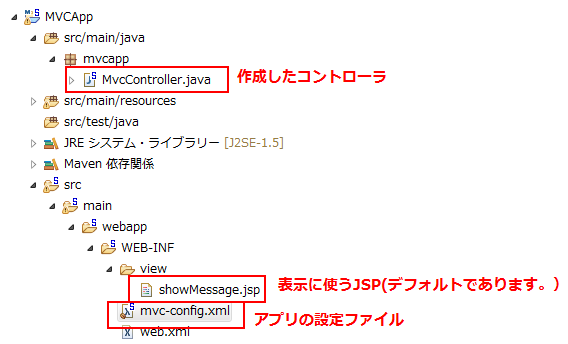
プログラム作成後の配置
プログラム作成後は、下記の配置になります。

実行結果


この記事へのコメントはありません。