前回の記事では、AOPを設定ファイルから実行してみました。
次は、設定用のクラスを作って、AOPを実装してみましょう。
AOPをクラスファイルからの設定で実装してみる。
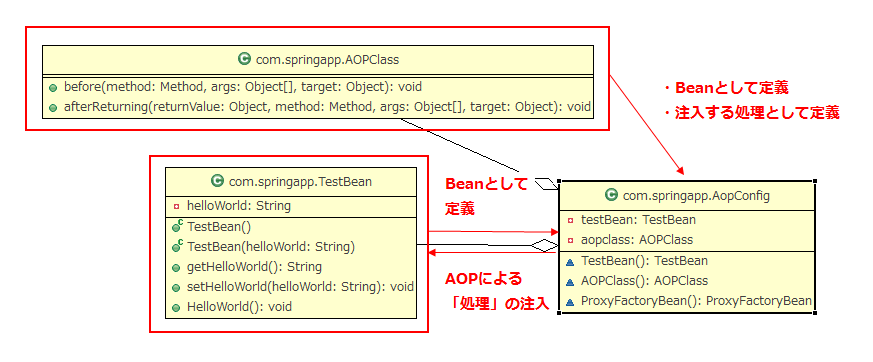
実装イメージは、下記のクラス図を参照下さい。

Main.java(利用するプログラムです。)
|
1 2 3 4 5 6 7 8 9 10 11 12 13 14 15 16 17 18 19 20 21 22 23 |
package com.springapp; import org.springframework.context.ApplicationContext; import org.springframework.context.annotation.AnnotationConfigApplicationContext; public class Main { public static void main(String[] args) { ApplicationContext app = new AnnotationConfigApplicationContext(AopConfig.class); //AOP適用前 TestBean bean1 = (TestBean) app.getBean("TestBean"); bean1.HelloWorld(); System.out.println("--------------------"); //AOP適用後 TestBean bean2 = (TestBean) app.getBean("ProxyFactoryBean"); bean2.HelloWorld(); } } |
クラスからAOPの設定を読み込む構文
設定クラスを読み込むために下記の構文を使っています。
|
1 |
ApplicationContext app = new AnnotationConfigApplicationContext(設定クラス名.class); |
その他の構文に関しては、設定ファイルから読み込む場合の構文とそれほど違いはありません。
TestBean.java(AOPを適用するクラスです。)
|
1 2 3 4 5 6 7 8 9 10 11 12 13 14 15 16 17 18 |
package com.springapp; public class TestBean { private String helloWorld; public TestBean() { super(); this.helloWorld = "Hello World!"; } public TestBean(String helloWorld) { this.helloWorld = helloWorld; } public void HelloWorld() { System.out.println(this.helloWorld); } } |
AOPClass.java(AOPで挿入する処理のクラスです。)
|
1 2 3 4 5 6 7 8 9 10 11 12 13 14 15 16 17 18 19 20 |
package com.springapp; import java.lang.reflect.Method; import org.springframework.aop.AfterReturningAdvice; import org.springframework.aop.MethodBeforeAdvice; public class AOPClass implements MethodBeforeAdvice, AfterReturningAdvice { @Override public void before(Method method, Object[] args,Object target) throws Throwable { System.out.println("事前処理"); } @Override public void afterReturning(Object returnValue, Method method, Object[] args, Object target) throws Throwable { System.out.println("事後処理"); } } |
AopConfig.java(AOPの設定クラスです。)
|
1 2 3 4 5 6 7 8 9 10 11 12 13 14 15 16 17 18 19 20 21 22 23 24 25 26 27 28 29 30 31 32 33 34 |
package com.springapp; import org.springframework.aop.framework.ProxyFactoryBean; import org.springframework.context.annotation.Bean; import org.springframework.context.annotation.Configuration; @Configuration public class AopConfig { private TestBean testBean = new TestBean("Hello World!"); private AOPClass aopclass = new AOPClass(); @Bean TestBean TestBean() { return testBean; } @Bean AOPClass AOPClass() { return aopclass; } @Bean ProxyFactoryBean ProxyFactoryBean() { ProxyFactoryBean bean = new ProxyFactoryBean(); bean.setTarget(testBean); bean.setInterceptorNames(new String[]{"AOPClass"}); return bean; } } |
下記のアノテーションを使っています。
使っているアノテーション
| アノテーション | 説明 |
|---|---|
| @Configuration | 設定クラスとして宣言するためのアノテーションです。これを設定しておけば、メインプログラムから設定用クラスとして呼び出せます。 |
| @Bean | Bean設定のアノテーションです。これを設定しておけば、メインプログラムから「getBean("Bean名")」でオブジェクトを取得できます。 |
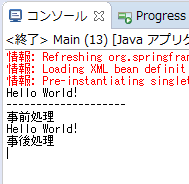
実行結果


この記事へのコメントはありません。